How to Inscribe Delegate on Luminex
Safety. Scale. Success. Luminex - the launchpad for the biggest and best.
Inscribe Degelate with Luminex
In the Ethereum ecosystem, the term we use for creating NFTs is “mint,” meaning “to forge.” However, in the Bitcoin ecosystem, there is a unique term for creating NFTs called “inscribe,” which translates to “engrave.” The resulting item is called an “inscription.” When people in the community talk about creating NFTs, they often use the phrase “inscribe an inscription.” For example, when someone asks, “What are you inscribing today?” they’re asking about what NFT is being created. Of course, if you’re more comfortable using the term “mint,” that’s also perfectly fine.
So, how do you inscribe an inscription?
You need three things: Bitcoin, wallet, and an inscribing platform.
There are currently multiple platforms being used in the Bitcoin ecosystem for inscribing. Since Luminex is one of the most popular at the moment, we will tutorial you on “How to Inscribe Delegate Using the Luminex Platform”.
Luminex currently offers three options for inscription: Text, Files, and Delegate.
Inscribe Delegate
Step 1: Visit the Luminex Home Page and click the “Mint Ordinals“, select “Delegate“. Then connect wallet.
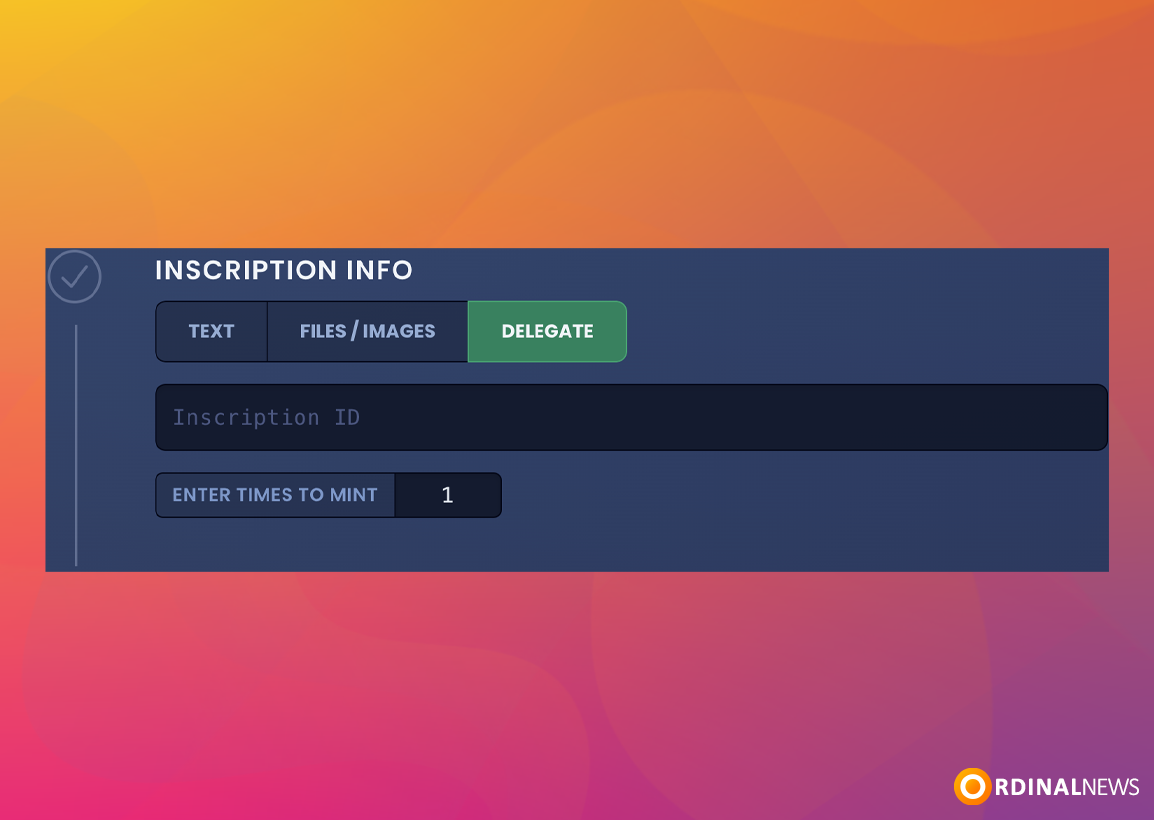
Step 2: You need to enter the ID of the Inscription you previously inscribed into the form.
Step 3: Inscription settings(Optional):
- Rare Sats: Here, you can inscribe on any Rare Sats available in your wallet. If you do not have any Rare Sats, you can click the “Buy” button to purchase the Rare Sats listed and inscribe on them.
- Parent/Child: Enter Parent Inscription ID
- Metadata: You can write the metadata of what you want to inscribe
- Reinscription: Set inscription ID (only confirmed) or utxo location to reinscribe on. Make sure your inscription is at offset 0 and you dont have multiple inscriptions on the same UTXO.

Step 4: After selecting the file you want to Inscribe, the next page shows you how much it costs for Inscribing Delegate. Enter the address to receive the assets.
You can also set the network fee here. The picture shows “MEDIUM 6 SATS/VB” and “CUSTOM“. Click on “CUSTOM” to set the network fee rate. Then click “MINT“.

Step 5: Confirm Transaction
![]()
Step 6: You successfully Inscribed Delegate. Wait for the transaction confirmation.
NOTE: Transcation confirmation takes a minimum of 10-20 minutes.
Step 7: After 10-20 minutes, you can view the Delegate you inscribed in your wallet.
Incribing Bitcoin Ordinals with Luminex is a straightforward process that involves connecting your wallet, filling out the required form, and paying the network fee. By following the steps outlined—visiting the Luminex platform, configuring your Delegate details, and confirming the transaction—you can successfully inscribe a new Delegate. After a brief wait for transaction confirmation, you can view your inscribed Delegate in your wallet. This method offers a user-friendly way to engage with Bitcoin NFTs, leveraging Luminex’s popular platform for efficient and effective inscribing.